Sunday, January 31, 2010

What's Missing From this Picture...


...if you guessed a picture, then you are correct. I was completely distracted throughout the entire cooking process today, which fortunately did not detract from the quality of the food, but it did make me forget to take a picture. Therefore, you will be subjected to more pictures of my dog. Simply because he is awesome.

Tonight we visit another recipe from the "Everyday Stuffed Pastas" section of the "Everyday Pasta, Polenta, and Risotto" chapter. Beef and Cheese Manicotti was more involved than I thought it would be, and being distracted, it was hardly a smooth process.

First of all, I will take time to commend Wal-Mart on their pasta selection. I went there to pick up a few things, took a look at their pasta section thinking they couldn't possibly have manicotti shells, but lo and behold, they had them in their "Great Value" brand saving me time and money on my day of shopping. I don't say this often, but kudos Wal-Mart, kudos.

I gathered all my ingredients together before I began cooking, but apparently I wasn't prepared enough. My beef was barely defrosted along with my marinara, I needed to chop an onion and some garlic that wasn't ready to go when I needed it, oh yeah, and I forgot that my baking dish doesn't fit in a toaster oven.

That being said, as I boiled my pasta water, I heated a pan and threw in the bit of beef that was defrosted (I really didn't need much of it), and the onion that I had quickly chopped up. Once it had browned and my onion was translucent, I removed it from the heat and let it cool. I then dropped my two manicotti shells in the boiling water and prepared my filling.

I mixed some ricotta, mozzarella, garlic, salt, pepper, and basil for the filling. Once the beef had cooled, I stirred it in. I then had to tackle my baking dish problem.

I covered my toaster oven tray with aluminum foil as usual, then partially covered that with some marinara sauce. I removed the manicotti from that water once they were firm, but gave a bit, then attempted to fill them.

In Giada's recipe, it simply says, "Fill the manicotti with the cheese-meat mixture," Easy right? No. Not without ripping the manicotti a bit and more filling falling out than going in. It was frustrating to say the least, but I survived. I placed the now stuffed manicottis on top of the sauce, then covered them with more sauce, mozzarella, and Parmesan. I baked it in the toaster oven for about 35 minutes at 350 degrees.

For some reason, I had a good amount of filling left over and decided to take a taste. I completely forgot that there was raw garlic in this mixture, so you can only guess what I bit directly into. Awesome. Thankfully I don't have to socialize with anyone today.

As I mentioned before, my distraction while cooking (which I didn't go into detail about. It was mainly text messages, answering our door, and talking to my roommates) did not take away from the goodness of my dish. I always feel so accomplished when my baked pasta is cooked through just right. It's a weird process leaving it all to chance in the oven after not cooking it completely in the pot. The cheese and beef mixture was creamy and smooth and full of flavor, and was complimented nicely by the marinara. I personally think I might make a big batch of this in place of something like baked ziti for a family party. That is if I can master the whole stuffing process.

Another day, another recipe, and I have two more planned for the week! I plan to cook again Tuesday, but only if I am able to obtain the main ingredient...check back then to see how it all goes down!

Wednesday, January 27, 2010

There Are No Absolutes in Life-Only Vodka...


I don't really know where that quote is from, but I know that it does relate to tonight's dish. I'll preface this entry by saying that I think I have found my new favorite thing to make. Yes, I have a lot of favorite things to make. But this dish is definitely in the top ten. Ladies and gentlemen, I give you...Vodka Sauce!!

Seeing as I live on a dry campus, this was a covert operation that had to be conducted off campus. You may be thinking, "Brianne, you cook the alcohol out of this sauce and you hardly use any at all." You may also be noting that I've never actually disclosed what college campus I live on in any entry (however if you know me, then you would already know). All that being said, by the off chance that a college administrator looks at this blog and figures out who it is and where they are, I am not about to get kicked off campus for making sauce. End of story.

I always thought Vodka Sauce would be a long, complex process (don't ask me why. Delicious things always seem like they should be very time consuming). I was wrong. It all starts with some marinara sauce. Being the resourceful chef that I am, I froze some of the sauce I made earlier so it was already made and ready to go for this dish. You heat the marinara with some vodka for about 20 minutes to cook out the alcohol and reduce the mixture.

Note: Unless you want to taste death, DO NOT taste-test this sauce before it has reduced. I am speaking from experience.

After the reduction, you add some heavy cream or, my new favorite go-to item, fat-free evaporated milk. Once this has been heat through, you remove the pan from heat, stir in some Parmesan cheese, salt, and pepper, and serve it over pasta. I chose the standard penne for mine.

I wasn't sure how the sauce would come out having not used heavy cream, but it didn't matter at all. The only thing that was missing was that terrible lethargic after-feeling from eating something so rich. When I first went on my healthy food kick, I feared I would never be able to eat a creamy sauce again without feeling guilty, but my nice little swap in this dish has proven that theory wrong!! I am in LOVE with my vodka sauce. In fact, I'm having leftovers tomorrow night.

Side note: according to Giada, vodka sauce is actually an Italian-American sauce. You will not find it in Italy!

I am officially cooked out for the week. I probably didn't make up all of the weeks I had taken off during my break, but I do feel as though I am back on track with this project. The next time I cook will probably be Sunday, so please check back then for more delicious eats!! Ciao!

Tuesday, January 26, 2010

Eggs-ellent


Sorry, I couldn't resist the corny title. You know me. Welcome readers to the SEVENTH cycle through Everyday Italian! Considering my field hockey jersey number is seven, this cycle is set to be one of the best yet. I've looked ahead to the recipes, and we're all (but especially me) in for a treat!

As you can probably deduce from the title, I made the last recipe from the "Everyday Antipasti" "Everyday Frittatas" section. Tonight's dish was Frittata with Asparagus, Tomato, and Fontina Cheese. Mmmmmm!!!!

Brace yourselves for some major improvisation coming up. To make my frittata, I first whisked together some eggs, evaporated milk (in place of heavy cream), salt, and pepper. Easy.

I then heated some EVOO spray in a pan and sauteed some asparagus for about two minutes. I never thought to saute asparagus. In my mind it's always been something you either roast or steam. You learn something new everyday.

As that was cooking, I had to seed and dice a tomato. Confession: I don't know how to seed a tomato. Rather than looking up this somewhat vital task, I took matters into my own hands. I mean, it obviously meant to remove the seeds in some way, right? I started by trying to maneuver my knife through the seedy parts of the tomato, but found this rather tedious and frustrating. Just as I was about to throw the seeds in with my diced tomato, I realized that the seeds fall out on their own pretty much once you start dicing. Dear Giada, you may want to make this a side note. Just a suggestion.

I added the tomato to the pan and then sauteed that for about two minutes. As it cooked, I ate the tomato remains. When I was younger and didn't eat anything other than bread, butter, or pasta, I always saw my mom pop tomatoes like they were candy. Seeing as I hated anything that had any nutritional value at the time (aside from broccoli heads), I found this disgusting. Being older and wiser, I now fully understand how someone could do this. I could easily eat an entire container of cherry or grape tomatoes or just slice up a normal sized one and eat it as is. And I would not feel bad about it.

Once the tomato had been thoroughly sauteed, I poured the egg mixture over the contents of the pan. Next, I was supposed to top it with some fontina cheese. I used the same logic as the previous entry with the mascarpone cheese and decided not to buy fontina for just one recipe. Instead, I used some Garlic and Herb Laughing Cow cheese (which, of course, is also a healthier alternative). I personally think it was better than the fontina would have been.

I cover the pan then let it cook another two minutes. Now comes the tricky part. As you may know from my last frittata recipe, you are supposed to stick the entire pan under the broiler to finish cooking it. My pans certainly are not "oven-safe" and they most definitely will not fit into a toaster oven (which has a handy-dandy broil feature). Ergo, I carefully transferred the half-cooked frittata to the little baking sheet, then cooked it over the broiler. As you can see in the above picture, it was far from perfect or pretty. But it did cook all the way through and brown rather nicely!

I must say, this frittata came out much better than my last. Everything was cooked all the way through, and to be honest, I liked the ingredients in this one better than the last. It was moist and full of flavor from the tomato and the hints of cheese here and there were nice surprises.

Who said you can't cook frittata in a toaster oven? Don't challenge a college student, they WILL prove you wrong. I will be cooking once again tomorrow night with a new sauce (it's one of my personal favorites...and will have to be cooked off-campus...dun dun dun). Check back tomorrow!!

P.S. For half the original recipe with my healthier alternatives, this recipe was only 6 WW points!! Hence why I have a boatload of frittata on my plate :)

Sunday, January 24, 2010

She's a Pineapple Girl in a Nutella World...


Yes, those are definitely not the lyrics to that song. And if you know what song I'm referring to, congratulations :) What you see pictured above is a dessert so decadent, so delicious, I can hardly find the words to adequately describe it. The process of making it, not so smooth. I suppose I was overdo for an (almost) recipe meltdown. But here's how it all panned out.

The first step in making Grilled Pineapple with Nutella is to toast the hazelnuts, husk them, then chop them. I pretty much cut out this step by buying blanched hazelnuts that didn't need husking and just chopped them and set them aside.

Next, you are supposed to mix some mascarpone cheese with some vanilla extract. Last time I bought mascarpone for a recipe, I hardly used any of it at all and when I went to use it again (before it went bad I might add), it had grown mold since I hadn't used it in so long. In order to cut some calories and save some money by not wasting food, I opted for some Cool Whip Free. It's considerably less calories and fat, but still creamy and tasty.

Next, I had to take some Nutella and combine it with heavy whipping cream. I think I've mentioned this before, but I read on the WW website that a healthier substitute for cream in recipes is fat-free evaporated milk. I figured I could substitute it here just a easily. I was so very, very wrong.

After mixing the two together, you need to microwave it to warm it up, stirring every 20 seconds, for about one minute. The first time I went to stir it, it was chunky and partially solidified. The picture of the recipe in the book has this mixture looking like a drizzly syrup, so I knew this had to be wrong. I microwaved it for another 20 seconds hoping for some improvements. No such luck. It was even chunkier. Thinking on my feet, I wanted to add some milk to it to keep the flavor and hopefully reconstitute it. Unfortunately I had finished my milk a mere hour beforehand. BUT, I did happen to have some fat-free hazelnut creamer in my refrigerator that would solve my problem and certainly preserve the flavor. My Nutella mixture livened back up (though it still maintained some chunks. Turns out Nutella is delicious in any state of matter) and was able to drizzle somewhat easily over the pineapple.

As the above catastrophe ensued, I was grilling some pineapple rings on the George Foreman (I realize it would be easier to refer to it as "the grill" and everyone would more than likely know what I was talking about, but it's so much more fun to think of a heavyweight boxing champ helping me out in the kitchen, isn't it?). It only took about three minutes per side to warm the pineapple through and make some pretty grill marks.

For the assembly, I placed the pineapple on the plate, drizzled the Nutella on top of that, then topped it with the Cool Whip and chopped hazelnuts. One bite, and I was in love. This combination is AMAZING!! I know I have mentioned before that when it comes to desserts, I'm more of a chocolate than a fruit person, but this combined the two and was heaven. It's not a dessert to prepare for a large amount of people, but it's nice for maybe a group of four or maybe a date night.

That's all I have for now. I'll be taking a night off from Everyday Italian and come back to it on Tuesday to start my SEVENTH cycle through the book! Pretty crazy that I've done that many recipes so far. To celebrate, I will leave you with this clip from a classic show, Rob & Big.

Saturday, January 23, 2010

Good Ole Steak 'n' Potatoes


Yes, that is what this dish basically is...but Italian! I will admit, I'm not really a steak-and-potatoes kind of girl. I would rather have a nice, fresh salad, or perhaps a hearty pasta dish with some lean meat than that traditional combination. However, after tonight, I could be convinced otherwise.

I tackled TWO recipes tonight with Steak Florentine and Roasted Baby Potatoes with Herbs and Garlic. Steak and potatoes. I started with the potatoes. Being the slightly more experienced chef that I am now, I read through both recipes yesterday so I knew how to manage my time today (...or maybe I was just really excited to cook and wanted to read up on it). I started the potatoes at about quarter to four. First, I minced a small clove of garlic and put it in a bowl with some Italian seasoning and parsley. I whisked this all together with some olive oil (yes, I used ACTUAL olive oil) then tossed some fingerling potatoes in it with salt and pepper. I then baked them in the toaster oven for about an hour at 400 degrees.

Next, on to the steak. The recipe called for T-bone steaks, but before coming back to school my mom let me have an extra strip steak that she happened to have to take back to school. Just as good, right? I trimmed the steak as best I could, but I don't really know much about trimming steaks, so I probably did it wrong.

Giada's recipe doesn't really explain the "Florentine" aspect of this dish's name, so I turned to one of my new obsessions; The New Food Lover's Companion. It's a huge dictionary of pretty much any food or food term you could think of. This is what it said about "Florentine:"

"French for 'in the style of Florence (Italy),' and referring to dishes (usually of eggs or fish) that are presented on a bed of spinach and topped with Mornay Sauce. A 'Florentine' dish is sometimes sprinkled with cheese and browned lightly in the oven. The Italian term is alla Florentina."

This dish does not fit that description at all. First of all, this is steak, not eggs or fish. There is no spinach involved or Mornay Sauce (which is a bechamel with cheese and other creamy things). And the oven is not used to cook the steak at all.

Instead, Giada's recipe grills the steak (I used the George Foreman as usual which is quite convenient, but nothing really replaces that "cooked-on-an-actual-grill-smokey taste"). First though, I halved a clove of garlic and rubbed it on both sides of the steak, then seasoned each side with salt and pepper. I then placed the steak on the grill.

Now, the recipe calls for T-bone steak that are 1 1/4-1 1/2 inches thick. My strip steak fit that description, so I knew I could follow the cook times given in the recipes. According to Giada, you should cook the steak for five minutes per side if you want it rare, and seven minutes per side for medium-rare. I like my steak dead. Completely well-done. There was no time listed for that degree of "done-ness," so I went with about 10 minutes per side. Also unfortunate is the fact that George Foreman grills are not uniformly hot throughout the surface. One tip of the steak refused to cook at all.

Though the recipe says to flip the steak only once, I ended up flipping it about three to four times. The tips still weren't brown. I then decided to close the grill on the steak. This did speed up the cooking process a bit, but needless to say, my steak was not done cooking till about 15 minutes after I took the potatoes out of the oven and tossed them in the remaining herbs and oil.

After I gave up on getting the tips of the steak well-done, I removed it from the grill and put it on my plate. I then had to drizzle it with some fresh lemon juice and olive oil. I happened to have some fresh lemons on hand and, yes, got to use my new juicer!!!! Thank you Caitlin!

I let the steak rest five minutes before eating it so that the juices wouldn't spill out once I cut into it. As you can see in the picture, the only knives that I have (other than my big, scary ones that I use to chop stuff) are butter knives. Butter knives are not ideal for cutting steak. It was a battle to say the least.

The potatoes were DELICIOUS and soft and may have been better if they were warmer, but I didn't anticipate the steak taking so long (if this were a challenge on Cook or Be Cooked, I would have lost some points for not serving them hot). Also, the fingerling potatoes I bought were a mix of white, red and purple ones. There's something really fun about eating purple food :) The steak was also really good! Like I said, I'm not a huge steak fan, but the lemon was something I had never had on a steak before. My plate ended up looking like it always does after eating steak and that's with all the fat pushed to one side (I kind of freak out when I bite into a piece of meat and hit some grizzle, so I just don't take any chances).

And there you have it, TWO recipes, one night. Aren't you proud? I plan to finish this cycle of the book tomorrow night with a dessert recipe. Gotta love the beginning of the semester when you have a deceivingly large amount of free time!

Thursday, January 21, 2010

Martin Doesn't Know. Martin Did My Taxes...


When all else fails, use a line from the most recent commercial as your title.

Hey there everyone! Before I get too much into tonight's dish, allow me to explain the above pictures. I made Individual Vegetarian Lasagnas tonight. The recipe wanted them made in individual gratin dishes with 6-inch diameters. All I had to use were these ramekins that were about 3-inches in diameter. Luckily, three and three equals six, which explains why it looks like I pigged out with tonight's meal. Also, my hand is in the picture to PROVE that these ramekins were actually that size (a point of reference if you will). Lastly, my hand is very red because I had just finished doing the dishes in some hot soapy water.

Onto the fun part! I made some marinara sauce last night to use in my lasagnas. I'm pretty sure I can make that sauce in my sleep now, and it would STILL taste good. I ended up making much more than I needed for this recipe and freezing it since future recipes will be needing some.

The first thing I did tonight for the lasagna was steam some asparagus. I had to call my mom on this one because I had never steamed anything before (I thought I would have to steam the clams in an earlier recipe, but if you can recall, I had to shuck those. That's something I only need to do once in my lifetime). I cut the asparagus into 1/4-inch thick pieces, as suggested by Giada, and steamed them in about an inch of water. Once the water was boiling, it took no time at all to cook the asparagus. I wasn't too worried if they weren't completely soft because I would be sauteing them later on. As the asparagus steamed, I drained a rinsed some cannelini beans and set them aside.

After draining my asparagus and setting it aside, I used the same pot to boil the water for my lasagna sheets. I will note here that I can now be the chef formerly known as the Queen of Improvisation. Tonight, I was the Queen of Efficiency. For making lasagna, I used hardly any dishes at all. As the water boiled, I drained one-third of a package of frozen spinach, then finely chopped one-quarter of an onion.

I'm not entirely sure how this happened considering I don't use my box of lasagna sheets as maracas or anything similar, but most of the pieces I had left were, well, pieces. I had to do some puzzle work to make up two full sheets of lasagna. A minor set back, and really who needs full sheets of lasagna when you're just going to destroy it when you eat it anyway?

As the sheets cooked, I added the onion to a heated pan sprayed with EVOO. I then drained the sheets after about four minutes, rinsed them, and covered them with a damp paper towel. I will note here that I transferred the sheets to a bowl I had used to press the water out of the spinach. This may not be interesting to you, but I am STILL impressed by my efficiency.

To the onions, I added half of a small carrot, finely chopped. Yet another side note: despite my sub-chef-quality tools (though I must say I probably have better kitchen equipment than most college students), I have become an excellent chopper. I used to struggle with cutting carrots thin enough to be considered "finely chopped," but now it just comes second-nature with hardly any effort. Just think of what I could do if I had a knife set like Guy Fieri...wouldn't that be a great birthday gift.....???

After about three minutes, I added one-quarter of a finely chopped zucchini. Giada's recipe also calls for a finely chopped yellow squash at this point in the recipe, but it's January, and summer squash is clearly not in season. Unlike summer squash, winter squash does have some WW points value and I was not willing to budge on my total for this dish.

I added the asparagus to the pan after five minutes and allowed that to saute for another two. Unlike other recipes I have completed, this one asked me to season the veggies AFTER they were cooked. Ergo, I added some salt and pepper to the pan, then removed it form the heat.

And now, the assembly!! I first put a teaspoon of marinara sauce on the bottom of each ramekin. I topped that with a lasagna sheet that was cut to fit the bottom of the dishes (actually, it was more like I solved a puzzle to cover the sauce). Next, I layered the beans, which had been tossed with some salt and pepper, and topped those with some spinach. I then placed another pasta circle on top of that along with another teaspoon of marinara sauce. Then came the veggie mixture divided equally between the dishes with another teaspoon of marinara. Finally, I topped it all off with one last pasta circle, one last teaspoon of marinara, then two tablespoons each of part-skim mozzarella.

The lasagnas went into the toaster oven for 20 minutes at 375 degrees. These ramekins were PERFECT for the toaster oven. I was thankful I didn't have to Rachael Ray my way up to the kitchen, or assemble everything then wait for the big oven to get hot once I was up there.

I must say, I absolutely LOVE this recipe. For one thing, anytime I can eat everything that's in front of me and consider it a reasonable and healthy portion size, I'm happy. Secondly, the veggies were completely cooked (obviously after they had been well sauteed), but not mushy as vegetables can get if overcooked. In case you didn't notice, this recipe didn't use any ricotta which I consider to be a staple of lasagna. I'm pretty sure the cannelini beans took its place and they were just as good. They were much different than any beans I had had before. They weren't firm anymore and became creamy in both texture and taste. Delicious!!

My second picture above was my attempt to show off the colorful filling of the lasagna despite the mess I made of the dish. That was really the only downfall, it was a little tricky to eat the lasagna out of the ramekins, but as I said before, lasagna is SUPPOSED to be messy.

Another successful dish, but my week isn't over yet! I plan to tackle TWO, yes TWO, recipes either tomorrow or Saturday. Check back to experience some Everyday Italian Throwdown history!!

Tuesday, January 19, 2010

This Post is Dedicated to Caitlin...


...for the sheer fact that she actually sounded mad at me when I said I hadn't posted on this in awhile. My dearest Caitlin, this post is for you!!

It definitely felt good to do some cooking tonight!! We start classes tomorrow so I didn't have anything to do today (other than run some errands and sign a lease so that I'm not homeless next semester), ergo I was antsy to start cooking. I always say that I can't eat dinner before 5 p.m. otherwise I feel like an old person trying to catch that early bird special, but I ate around 4:30 p.m. tonight. I am weak.

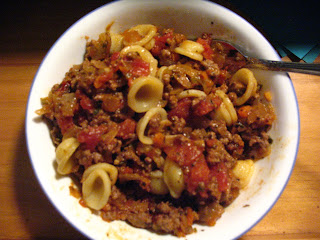
Tonight I made another recipe from the "Everyday Sauces" chapter in the "Everyday Tomato Sauces" section. It was a Simple Bolognese aka "meat sauce." When it comes to tomato sauces, I generally opt for marinara over meat, but I figured I may like meat sauce more if it were my own creation...and if it didn't say "Prego" or "Ragu" on its jar.

I started by cooking some minced onions and garlic until they were soft. I was only making half the recipe (some for tonight and leftovers for tomorrow) so I used one clove of garlic and half an onion. This whole plan must have slipped my mind in the next step of adding carrots and celery. I should have used half of each, but I was in some sort of daze and just added a whole one of each. I think Common's "Universal Mind Control" on mtvU had me mesmerized. Thankfully you can't go too overboard with either of those vegetables and it didn't make much of a difference. Plus it wouldn't be one of MY recipes unless something went wrong, right?

After I sauteed those over medium-high for about five minutes, I cranked the heat up to high and added some ground beef. In true health nut fashion (side note: I was the opposite of a health nut all winter break. Chocolate and Christmas cookies are my vice), I used 95/5 ground beef. I was a little afraid that this would result in some dry beef crumbles in my sauce, but this was not the case.

Next, I had to add a can of crushed tomatoes, parsley, basil, salt and pepper. I realized I didn't buy crushed tomatoes, but did have some diced ones in burgundy wine. I wasn't sure what the wine flavoring would do to the sauce, but seeing as burgundy is a dark color and I was working with some dark meat, I didn't really see a problem with it (great logic, I know). Diced versus crushed tomatoes would only make for a chunkier sauce which also didn't faze me. Being a college student without my own fresh herb garden, I used some dried basil and Italian seasoning rather than the fresh versions suggested in the recipe.

I then let all of this simmer and thicken for about 30 minutes. In the mean time, I boiled some salted water and cooked up some orecchiette to serve with the sauce. After 30 minutes, I stirred in some Parmesan cheese to the sauce as well as more salt and pepper.

As you can see from the picture, my bolognese ended up looking like some sort of Italian sloppy joe. The consistency was very chunky, but the flavor was surprisingly smooth. It wasn't overpowering and the beef wasn't dry (I think I have the tomatoes to thank for that). It was MUCH better than any jarred meat sauce I had had before (one would hope this would be the case with anything that comes in a jar).

Overall, a successful first night back in Everyday Italian! As I said before, I'll be eating leftovers tomorrow night (which will be nice seeing as tomorrow is my first day of classes), but will be making some marinara sauce to use in some future recipes. I will see you again on Thursday when I put together another "Everyday Pasta, Polenta, and Risotto!"

Saturday, January 16, 2010

Back to Basics


Hello everyone!!

First off, I apologize for not keeping up with this during break. As I've said before, it actually is difficult to find time to cook while home! As much as I love to cook, I love having my mother and others (including some fantastic restaurants around here) cook for me too. It's nice not having to plan it all out every so often and just have a plate of food placed in front of you. You would understand if you've ever had my mother's cooking :)

I will be returning back to school tomorrow and plan on tackling four (yes FOUR) recipes this coming week. I didn't set a specific deadline for this project to end, so I can't say that I'm behind, but I was expecting to be a bit further than I am by this point. Finishing four recipes this week will wrap up the current cycle of the book I have started so I will finally feel a sense of closure with that (it kills me to have started with an antipasti then not cook for a week).

As for today, I just finished baking some cookies (and I must say, they may be my best batch yet. The quote I used from Julie & Julia in my last entry definitely applies to my chocolate chip cookies) and will finish packing once I find some motivation. For now I'm lounging on my big bed with my dog (see above picture) before being subjected to a single bed in a walk-in-closet-sized bedroom back at school for another five weeks. It is sooo good being home :)

That's all I've really got for now. I'm going back to my bed, my dog, and the Kooks till that motivation comes around. Maybe even some Jersey Shore....it's addicting. See you this week for more fun with Everyday Italian!

Sunday, January 3, 2010

And Now For Something Completely Different...


Let's start with a quote, shall we?

"You know what I love about cooking? I love that after a day when nothing is sure and when I say nothing, I mean nothing, you can come home and absolutely know that if you add egg yolks to chocolate and sugar and milk, it will get thick. That's such a comfort." Julie & Julia

True, seeing as it is now winter break, I did not have a rough day where "nothing is sure." I think the most I accomplished today was some cardio kickboxing and shelf assembly. And with today's recipe, I did not know what to expect at all, so I didn't "absolutely know" anything. However, I did watch Julie & Julia recently, since I got it for Christmas, and I picked out that quote because it is completely true.

I apologize for taking a week to post again, but you know how the holidays are. Filled with tons of food that probably isn't good for you (especially if you go on the Christmas cookie and candy diet...) and adding in some big Italian dishes here and there really wasn't a possibility.

I'm back to the "Everyday Antipasti" chapter of Everyday Italian and in a new section, "Everyday Frittatas." There's only two in the section (which is fortunate so I more than likely won't have to make one at school), the first being Frittata with Potato and Proscuitto.

I started off by cooking a small, chopped onion over medium-heat in our big, huge frying pan (another luxury of home). After about four minutes, I added some potato, garlic, salt and pepper. My luck with potatoes has not increased much. Think back to my potato and vegetable casserole. Yes, raw potatoes. My potatoes in my frittata did not end up completely raw since they were almost all uniformly cut, but there were a few big ones that got away and were a bit crunchy in the middle. You live and you learn.

As that cooked, I preheated the broiler and made the egg mixture. This require six eggs, but for me it required seven. As I transferred the eggs from fridge to counter in two trips, one managed to roll on the floor. That actually sounds much too nice, as if it gently moseyed on down the sides of the cabinets and found its final resting place on the kitchen floor. It crashed on the floor. For those who have ever broken an egg on a kitchen floor, you understand that this is no easy task to clean up. Luckily my mother helped me out by covering the egg with salt so it was easier to pick up (who knew?), but even when it was completely off the ground, I was paranoid that I had missed some of it and that my dog would manage to find it (because he always does) and get sick.

I whisked the eggs with some fat-free evaporated milk (a swap for heavy cream as recommended by Weight Watchers), Parmesan cheese, prosciutto, and basil till it was combined. I then poured it into the pan with the potatoes and onions. I didn't notice that the recipe said to stir the mixture into the pan, so I then had to smooth it out to make it even and to make sure the eggs wasn't too thick in any given part.

Next, I turned the heat to medium-low and covered it for about two minutes. I then took the cover off and stuck it under the broiler for about four minutes.

Like I said before, I wasn't sure what to expect with this frittata. The basil stood out more than anything else to me (which is never a bad thing) as well as the potatoes. Surprisingly, the prosciutto just blended in (I usually have a nose for things related to ham) and so did the Parmesan cheese. It was good though, but probably not something I would order at a restaurant. It was also a little thinner than most frittatas since our big, huge frying pan is a little bigger and huger than the recipe needs.

I get to cook another sauce the next time I get a chance (probably not till next Saturday, sorry!). luckily I didn't set an exact deadline for this project, but fitting cooking in while home is actually harder to do! Check back then for more :)

P.S. I had a picture to post on here, but Blogger is being uncooperative at the moment, and my patience is wearing thin...